http://www.notjustahousewife.net/2011/03/features-x-2.html?utm_source=feedburner&utm_medium=feed&utm_campaign=Feed%3A+blogspot%2FlUkHL+%28Not+JUST+A+Housewife%29
So exciting!!

Thursday, March 31, 2011
Tuesday, March 29, 2011
Mickey Mouse Button T-shirt
Here is a super easy and simple shirt I made for my girls before our Disney trip. Mickey shirts made with buttons. First you need a mickey head shape. I cut mine with my Mickey font Cricut cartridge, but you could also print one off the Internet of free hand one. A t-shirt, tacky glue, buttons, and thread.
First I laid the mickey image on my t-shirt, then traced around it with the glue. I pulled up the image and all that was left was the glue outline, (sorry I didn't take pictures of this part). I laid the buttons in the glue in the pattern I wanted and let them dry that way. Then I went back when it was dry and sewed all the buttons on with a needle and thread so they'd be permanent.

My button stash is out of control, so it's always good to find a project to use some up!


I also made some quick and easy matching hair clips. Take an alligator clip lined in white ribbon and hot glue on some matching buttons - so cute!

My girls got tons of comments on their shirts while at Disney, so fun and unique!!


Tuesday, March 22, 2011
Hair clippies
A couple hair clips I made this afternoon - I think they turned out super cute!! Now to make another bow hanger for Claire's room, the number of hair clips she has are getting out of control!!
Monkey-

Minnie-

Duck (or maybe chick?)-

Monkey-

Minnie-

Duck (or maybe chick?)-

Sunday, March 20, 2011
Travel diaper case
I wanted to make a little bag to match my new wipe case and hold everything needed for a diaper change on the go-

First I laid out my fabrics, right sides together with a piece of fusible fleece on top-

I wanted it to hold three diapers, plus my new wipes case so I laid those on top to measure -


Then I cut the fabric leaving room for sewing the seams. It ended up being about 9x26 inches.

Then I started sewing, I went around 3 of the sides-

then trimmed the corners and turned it right side out-

It looked like this. The outside will be floral and the lining will be the purple print material-

I wanted the flap edge rounded so I traced a mixing bowl on the top, then turned it inside out again and sewed along the line leaving a small space to turn again-

I turned it right side out and sewed on some Velcro squares-

I pinned some ribbon onto the front letting it hang over the edge a little. Then I sewed up the edges to form a little bag (inside out again)-

When I flipped it it looked like this - finished, but I didn't really love the way the flap looked-

So I cut a 2-inch strip of my purple fabric to make a ruffle and sewed it in half-


Then I started pinning it to the flap in a pleated ruffle-
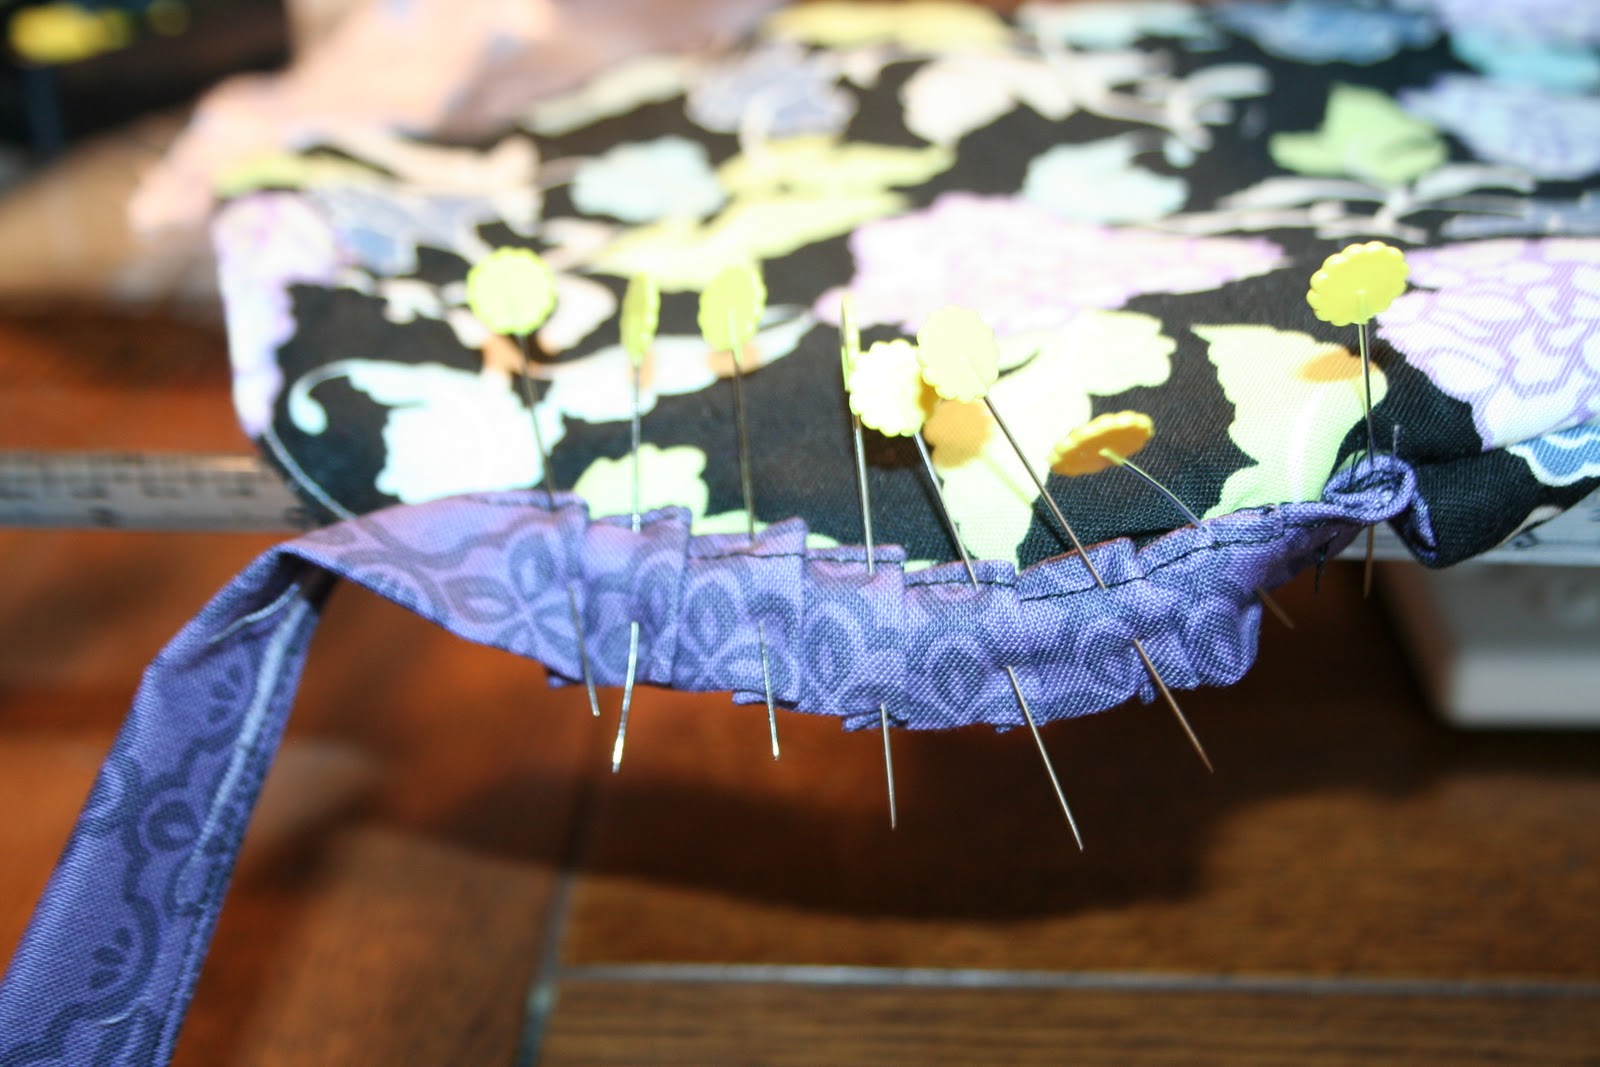
Once I stitched that into place I liked the finished look a little more-

With the flap open-

filled with my wipes case and 3 diapers-


What an adorable little set! I'm so happy with the way these turned out! I'm definitely going to be making more to share with friends!

Tooth fairy pillow
We just got back from the dentist where I found out that my oldest daughter has 4 loose teeth! I wanted to make a pillow for her to put her teeth in for the tooth fairy, but had a really hard time deciding what to make.
I finally decided on a little stripped pillow with a pocket to match her room. I cut 2-inch strips of fabric in coordinating colors and sewed them together. Then I sewed on a pocket. I sewed a solid flannel fabric on for the backing, right sides together on three sides. I sewed around the three sides about an inch into the pillow to give it an edge, then stuffed in a pre-made pillow.

To finish it off I sewed the pillow into place, then to finish the bottom edge I pinned the two layers of fabric together and stitch close to the edge.


It turned out so cute and my daughter loves it! Now we're ready for those teeth to fall out!


Baby wipe case
I've been wanting one of those spruced up baby wipe cases and decided to try making my own this weekend! It was actually easier than I was expecting, and no sewing involved - just hot glue!
To start I took my travel baby wipe case and traced it onto some felt, then folded the felt into thirds so that when I cut it out I had 3 pieces of felt shaped like the wipe case.

I then cut out my fabric slightly larger than the felt.

First I hot glued two of the layers of felt together. Then glued those two layers onto the top of the plastic wipes case. Then I started hot gluing my fabric to the edge of the wipe case, stretching the fabric and gluing small sections at a time. It looked like this when I finished -

I did the same thing with the bottom, but only used one layer of felt under the fabric, since I didn't have that little door to cover up on the underside. Then I started hot gluing ribbon around the edges to cover up the raw edge of the fabric, again working in small sections -

I started and ended in the back and heat sealed the ends of the ribbon to keep them from fraying -

and the finished wipes case - (I added a couple strips of ribbon and a bow to finish it off)

The underside is solid purple print-

edge view -

This turned out so cute, I can't wait to make more to have in the glove box, diaper bag, give as baby gifts, so many possibilities!!
Flower hair clip
Here is a quick, easy little hair bow that's super cute!
First I always put a little strip of shelf liner on the ribbon. It'll help the bow stay in fine baby hair a little better.

Then put more hot glue on the other side of the ribbon, opposite the shelf liner and clip the ribbon lined with hot glue into your alligator clip-

Keep hot gluing and wrapping the ribbon around the clip.
I always heat seal the ends on my ribbon to keep it from fraying. Just holding it close to a candle frame will do the trick-

finished clip-

Next I hot glued a loop of green ribbon to my clip and made 3 "8" shaped ribbons-

Stack and hot glue ribbons as you glue onto alligator clip. I just knotted the yellow ribbon and hot glued it to the center of the flower to finish it off!


Subscribe to:
Posts (Atom)